Sunday, 23 December 2012

Wargaming Table

The Crew from the game shop has been coming by to play some games and as often happens when a bunch of dudes get together and have some adult beverages we got to planning larger battles.  This ofcourse ment that my single table was simply not big enough for our plans!

So We set out to build a second matching table.  Daniel had some 2x4s kicking around his house and I had the plywood.  A quick stop at Home depot and I had the rest of the lumber and 4 wheels.

Supplies needed:

  • sheet 4'x8' plywood.  (5/8") (1 Required)
  • 2'x4' lengths of lumber.  (4 - 8' lengths required)
  • 2'x4' lenghts of lumber 45" long (8 required)
  • 2'x4' lenghts of lumber 31-1/2" long (8 Required)
  • 4 wheels.  rotating with locks is best.
  • Wood lag screws for securing wheels (12 required)
  • 2-1/2" and 1-1/2" wood screws
  • 4 pieces of plywood approximately 8"x8" (5/8")

Tools required:
  • Drill
  • Bit for wood screws 
  • Driver for lags
  • Measuring tape
  • Framing square
  • Chop saw with sliding arm or Radial saw (A hand saw will work as well.  And is much more manly)
Optional supplies:
  • Another full sheet of plywood for the base.  Its an excellent place to store stuff. (I skipped this for now)
  1. So first thing you need to do is cut all your pieces.  
  2. Once you have everything  cut its time to make your table and base frames. They are identical.
  3. Taking the uncut 8 foot lengths of 2x4 screw the 45" pieces between them.  This will give you a 4'x8' frame.   
  4. Measure 32" from either side and make a mark.  
  5. Slide in two 45" pieces (2 for the top and 2 for the bottom) Secure them.
  6. Now that both frames are done you can take the four small pieces of plywood and attach them to the corners of your bottom frame.  These serve three purposes.  1- they will hold your frame square. 2- they are what you mount your wheels too. 3- your table legs will sit on them)
  7. Go ahead and mount the wheels using the lags.
  8. Flip the base over onto the wheels.
  9. Now you can install your table legs.  They will sit right in the corners ontop of your wheel supports.
  10. Almost done!  Take your table top and secure the full 4x8 plywood sheet to it using the shorter wood screws.  During this step you can square up your frame if its a little out.
  11. Now with a buddy or by using Egyptian leverage techniques you can lift the table top up onto the legs.  It will slide down right over it and then you can fire some screws in!  
  12. Roll out the grass mat!!
 Patton oversees the Engineers
 The base frame
 The table top
 Legs installed


 Ready to rock!  You can see my original table with the base plywood installed.  Ill add one to the new one as well eventually.  Oh And I go full 4x8 feet because it gives you a foot on either end of your table for things like books and minis.  A nice laydown area.  Plus less cutting of lumber!

***We played an awesome Total War battle on two of these tables.  Heres some pics***


 ya my newly painted 88s were ready to rack up some kills until Sierra decided to hand them some rockets.



Thursday, 13 December 2012

Market Garden

Ok Im going to veer away from my Germans for a bit and focus on what Im currently working on.  With our impending FireStorm Market Garden campaign Sierra and I thought it was high time to pick up a box of British Paras.
After our Tanks giving event at the Local Game shop  we used our winnings to grab the box set!

Once I got it home and stopped crying about the 106 dudes I would have to paint I unboxed them.

I like to pull them out and clean them up one by one.  And place them in teams.  This is a good idea to make sure you have everything you need to make all the teams you require.  It also really helps to get you acquainted with what types of equipment and gear you will be painting.  You will need to make sure youve got all the proper colors.

 Once they are all cleaned up and organized I mount them onto golf tees with a dab of glue and stick em in styrofoam.  The next step is to prime!
 While the primer dries Ill do some research on the uniforms.  Trying to remember what book has the Brit Para guide in it...  Think its A bridge too far?

UPDATE:  Well I went for the glory and knocked out the Green Ochre Dry brush and all the Reflective Green and Flat Earth camo!  Im liking how its going so far.  Glad to have all that camo behind me though lol.

Havent decided how to base them yet.  Probably just simple static grass.  But Maybe Ill do a platoon on Rubble bases.

UPDATE 2:
Finally completed these guys!  And I think Im converted to Brits.  Really happy with the results and the basing I went with turned out better than I expected. I ended up going with 3 different basing themes.
 At this point the figures are complete so I set about labeling the bases and scoring them.
 Once they were all labeled I glued the figures on.
I decided to do one platoon on rubble bases.  I also made sure that one of the three HQ piats matched each of the platoons basing themes.  I primed the bases without the figures on them first.  Then used a mix of fine and extra fine basing grit around the figures.  After it all dried I primed the grit.

 Heres the completed Rubble based guys.
 These ones I wanted to try out my new snow flock.  I went with a early winter look.  Grass is dead and theres a light dusting of snow here and there.  I really like this look. My favourite of the three.
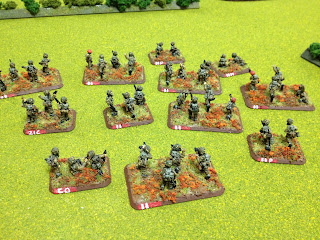
 Finally the Autumn guys.  I did the CO and 2IC in this theme as well.  Sierra loves orange so she will want these guys to be here #1.
 All the bases are labeled to show platoon.  Also Mortars, Piats and command are labeled.
Once they were all based I gave the whole company a generous shower of Testors Dullcote to seal them up nice.  Onward to Arnhem!